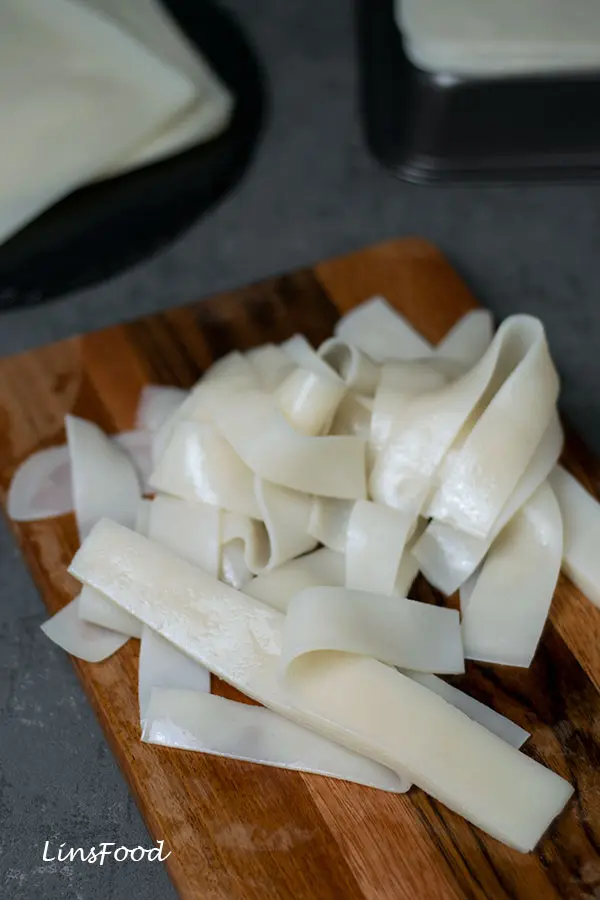
This is for all you guys who’ve written to me over the years to say, “but I can’t get hor fun/kway teow noodles anywhere!”. Now you can, in your own kitchen!
Estimated reading time: 11 minutes
Table of contents

What are Hor Fun Noodles?
Hor fun noodles (or ho fun) are flat rice noodles that owe their origin to the southern parts of China, including Hong Kong. The name itself is in Cantonese, the Chinese dialect popularly spoken in these parts.
These flat rice noodles have travelled across the sea, finding new homes all across South East Asia. As such, many local noodle dishes in these countries are made using hor fun noodles. The Indonesian Kwetiau Siram, Thai Pad See Ew and our own Char Kway Teow and Beef and Seafood Hor Fun are just a few examples.
Hor fun noodles are a necessary ingredient in the Singaporean and Malaysian kitchen.
When I first moved to the UK in the 90s, I struggled to find these noodles. So the obvious solution was to make them myself. It took me a handful of attempts before I was happy with the results – noodles that tasted and smelled of rice, were slightly chewy and wouldn’t break up too much when cooked. Those were a few messy but fun weeks!

Homemade Hor Fun Noodles
Making hor fun noodles at home is a very simple process; you only need 3 ingredients. This is what we’ll be doing:
- Make the hor fun batter by mixing the 3 ingredients.
- Steam the batter, a thin layer at a time to get hor fun sheets. Steaming takes 90 – 120 seconds.
- Peel the rice noodle sheets out, lay them on a board and grease. Do this for the rest of the batter.
- Cut your noodles up with a knife or pizza cutter. Cook it up immediately, or save for later.
That’s it. What do you think, doable?

The Ingredients
The 3 ingredients you need to make homemade rice noodles are rice flour, some sort of starch and water, that’s it. The ratio of the ingredients can be played around with slightly. Using more rice flour will give you grittier noodles, while using more starch with give you chewier and sturdier noodles that will withstand vigorous cooking in the wok.
Rice Flour
These are rice noodles, so we definitely need rice flour. We want ordinary rice flour, not glutinous rice flour. It should be easily found in Asian shops, whatever their inclination. Failing that, go online, Amazon has so many different brands and varieties.
Starch for Homemade Kway Teow Noodles
You need some sort of binding agent to make rice noodles. Without it, your flat rice noodles will be missing that signature chewy texture and will also fall apart at the slightest provocation.
The traditional and most popular starch used in making flat rice noodles is tapioca starch. You could also use potato starch or cornflour (aka cornstarch in the US) because they serve the same purpose, to aid texture and sturdiness to our homemade kway teow noodles.
However, I can safely say, from 20+ years of hor fun making experience, tapioca starch is the best starch to use, as it gives the perfect chewy texture, flavour and smoothness in homemade hor fun. It also makes the recipe easier, especially important for first timers.

Tapioca Starch in Hor Fun Recipe
As you’ll see in the recipe card below, I use tapioca starch when making hor fun. Not only does it give you better noodles, but it makes the whole cooking process easier. Flat rice noodles made with tapioca starch are:
- smoother
- less prone to breakage
- chewier
- less prone to sticking to your pan
- taste like the shop bought fresh hor fun and kway teow noodles we used to buy at our wet markets

Potato Starch
Potato starch can be used to replace tapioca flour but it’s probably my least favourite because it tends to leave a sticky residue after you peel the noodle sheet off the pan. You’ll have to rub it off before being able to pour the next batch.
But the main reason I don’t like using potato starch for homemade hor fun is because it has a stronger aroma and flavour than the other starches. It competes with the rice flour when it comes to the flavour and aroma. So while it’s okay to use potato starch in making hor fun from scratch, as mentioned above, it has its drawbacks.
Cornflour (Cornstarch)
Cornflour can also be used as a substitute for tapioca flour but you’ll have to use more of it in the flour to starch ratio. Otherwise, your homemade flat rice noodles will be more prone to breakage.
In the UK and I suppose many, if not most, Commonwealth countries, cornstarch is known as cornflour (1 word). Depending on where you are, look out for the starch, not the flour (or cornmeal) used to make tortilla and cornbread.
Water
And then you need some water to make our flat rice noodle batter. Room temperature water is best for this, although that is rather relative, depending on where you live. Basically, you don’t want hot water, nor cold water, but something that feels comfortable when you dip your fingers in. Goldilocks water!
Anything between 20 – 35 Celsius is fine (77 – 95 Fahrenheit).
Tools & Equipment Needed
You’ll need the usual bowls, ladles and such of course. But let’s take a look a the 2 most crucial things you need in your kitchen in order to recreate our flat rice noodles recipe.
A Steamer (or Wok/ Large Saucepan)
We steam the batter in the proper sense of the word to cook our homemade hor fun. So you either need a steamer or something that will allow you to steam your noodles. Like a wok or a large saucepan with a lid.
I own a steamer as used in our Kek Kukus here on SMR. However, it tilts slightly, making my hor fun sheet super thin on one side and thick on the other. And none of my large woks have a lid!
So as you can see in the video, I’m using a wide casserole dish type of pot, with a metal trivet. If you don’t have a metal trivet, use a small upside down saucer to place your baking tin on.
If you’re using a makeshift steamer (like me, image below), you have to ensure that the water in your pot/wok is a good 1cm away from the bottom of your pan when it’s sitting on the trivet. This is so your noodles will steam properly instead of being overcooked with the boiling water.

Steaming Pans for Hor Fun Noodles
The best pans for steaming your homemade flat rice noodles are non stick cake pans, and ones that are as shallow as possible. Square, rectangle or round, it doesn’t matter as long as they fit in your steamer/wok with the lid on.
When I first started making hor fun noodles at home almost 30 years ago, this was my biggest problem. I had cake pans aplenty, but no steamer and all the pots weren’t big enough!
Glass dishes work too but they won’t cool down quick enough for you to make the noodles seamlessly from one batch to the next. Placing them in cold water will crack them.
Stainless steel pans without a non stick coating may work, but you’ll spend half the time scrubbing off the sticky bits left on the pan before you can pour the next batch of batter. So definitely non stick pans. I’m using an 8″/20cm square cake pan in the video.

Mise en Place
Once you’ve made the batter and have got the steamer going, it’s time to set up your mise en place. What I mean by this is place everything you need (ingredients and tools) within reach, in the right order to ensure a smooth and continuous workflow. Here’s a screenshot from the video showing you what I mean.

- I have the stove on my left, with the steamer going.
- The batter sits top left where I can get to it easily, to stir, then ladle into the pan.
- I have 2 steaming pans, with the one closest to me (bottom) on a trivet, as it’ll come out of the steamer hot. You also want a tea towel or something underneath the trivet (not in picture), to soak up the drips from the wet pan.
- On the right, is a large chopping board where the cooked hor fun sheets will go once they’re peeled off the pans. You can use a baking sheet instead, but we’ll need to cut them later, you don’t want to scratch your baking sheet, do you? So a large chopping board is best.
- Just above the pans and board, you can see 2 bowls of cooking oil, one with kitchen paper to oil the pans, one with pastry brush to oil the cooked kway teow sheets.
This set up allows me to cook up my flat rice noodles with ease. So when you’re making yours, do something similar, have everything in front of you from left to right, or right to left, depending on how your kitchen is set up and perhaps whether you’re right or left handed.
I don’t have a kitchen island. The pans and chopping board are on a portable square bar table that I use for my online classes and YouTube videos. It acts like a small kitchen island when I need it.

How to Store Homemade Hor Fun Noodles
Half the time, when you’ve made these fresh flat rice noodles, you probably don’t fancy or don’t have the time to cook them up immediately. If you’re cooking them later in the day, just cover with a plate or clingfilm and leave on the kitchen counter for up to 4 hours, somewhere not too warm. We don’t want them spoiling, so don’t keep them out for too long.
You could also store the noodles in the fridge or freezer to make them last longer.
FRIDGE
- They’ll keep in the fridge, covered, for up to 2 days, but the noodles will stiffen and curl slightly, see image below.
- Just pour some freshly boiled water all over and leave to soak for 2-3 minutes until they soften. Chances are, they won’t quite straighten out but they will be soft and chewy, perfect for any recipe.
- Drain and rinse in cool water to stop them over heating and becoming gloopy. They will break upon stir-frying, but that’s no big deal, hor fun and kway teow do have a tendency to break, unlike wheat noodles.
FREEZER
- To freeze, cut them into strips by stacks (not rolled). Don’t peel the strips.
- Wrap the cut sheets as they are in clingfilm and freeze for up to a month.
- To thaw, just soak them in hot water for about 5 – 10 minutes until they can come apart easily. Just like shop bought frozen hor fun. Previously frozen hor fun or kway teow (shop bought or homemade) is more prone to breaking.

Using Hor Fun Noodles in Recipes
There are so many ways to use your fresh rice noodles. In soups, in wet noodle dishes and naturally, stir-fries. Look out for more recipes in the coming months, but in the meantime, here are two:


And there you have it. Homemade fresh hor fun noodles, ho fun noodles, kway teow noodles or flat rice noodles! Whatever you call them, if you can’t get them where you are, I’ve got your back!
If you enjoy the recipe, drop me a comment and let me know. And if you are feeling like a star, don’t forget that 5-star rating! 😉 Thank you!
If you make this recipe, post it on Instagram or Facebook and tag me @azlinbloor and hashtag it #linsfood.
Lin xx

Homemade Hor Fun Noodles Recipe (Flat Rice Noodles)
Equipment
- 1 large bowl
- 2 small bowls
- 1 small whisk or wooden spoon
- kitchen paper
- 1 pastry brush
- 2 non stick pans about 8"/20cm they need to fit in your steamer
- 1 steamer or wok with lid + trivet see article above
- 1 kitchen timer
- 1 large board or tray for cooked noodle sheets
- 1 rubber spatula or anything that's not going to scratch your non stick pans
- 1 knife or pizza cutter
Ingredients
- 320 g rice flour loosely packed 2 cups
- 130 g tapioca starch loosely packed 1 cup
- 300 ml water
- 60 ml vegetable oil for greasing
Instructions
Prep Work
- Place the rice flour and tapioca starch in a large bowl and slowly add water to it while whisking gently. Easy does it as we don't want too many bubbles.Keep adding the water until it's all used up and you have a smooth and fairly thin batter. We're now going to rest the batter for a few minutes while we get everything else ready.This 5-10 minutes allows your batter to rest a little, which allows the starch molecules to soak up more moisture for chewier noodles. Give it 2 hours, if you have the time.
- Set up your steamer as described in the article above. While waiting for the water to boil, set up your workspace.
- Add 2 Tbsp of the vegetable oil into a small bowl, keeping the rest in another small or medium bowl.Tear about half a kitchen paper sheet and squash it slightly, then dip it in the small bow containing the 2 Tbsp of oil. This is what you'll be greasing your pans with.Place the pastry brush in the other bowl with the rest of the oil.
Cooking the Hor Fun Noodles
- When the water in the steamer is boiling, reduce the heat to medium. Then, squeeze the kitchen paper to get rid of excess oil and lightly grease 1 cake pan (steaming pan).
- Pour a small amount of the batter into the pan and tilt slightly to ensure that the batter covers the whole pan in a thin layer. I'm using 2 small ladleful that measure 60ml (¼ cup).
- Place the pan onto the steaming rack, cover and cook for 90 to 120 seconds (1½ – 2 minutes) on medium heat. Set the timer on. Check at 90. You're looking for the whole surface to look cooked and 1 or 2 corners may have just started to curl up. Give it the full 2 minutes if unsure.Don't cook it for too long as the hor fun sheet will dry up and be prone to breaking.Get your second pan ready while waiting.
- Take the pan out of the steamer and place it on a trivet to cool for 30 seconds or so. It doesn't take long to cool down at all. Place the second pan into the steamer, cover and cook for 90 – 120 seconds (1½ – 2 minutes). Set the timer on.
- Using 1 rubber spatula (or anything flat that will not scratch your non stick pan), gently lift up one corner of the hor fun sheet and peel off the pan. Place it on the chopping board or a flat baking tray.You'll notice that the side that was facing up is matte, while the bottom of the sheet is glossy. That's how it should be. Place it matte side down on the board.
- Using your pastry brush, brush a little oil on the glossy surface of your noodles, this side is sticky.
- Get the second pan out of the steamer when that timer goes, and place the lid back on the steamer if you haven't got the next tray ready.Repeat the whole process until you've used up all the batter. Grease the pan, pour batter, steam, remove, grease the noodle sheet. Stack the sheets on top of each other. As you're oiling them, they'll come apart easily.You should get 10 – 12 sheets altogether, depending on how much batter went into each sheet.
Cutting the Hor Fun Sheets
- Two ways to cut the noodle sheets, flat or rolled. My preferred method is to cut them in strips as they are, stacked on top of each other.Do them in 2 stacks, because it's easier. So each stack will have about 6 sheets.I missed out this step in the video below. Look out for the full YouTube video in a few days, that will have the 2 methods.

- Then, just peel off each strip and use as you fancy.

Cooking or Storing
- Use them in recipes as mentioned above.But I can imagine that you may not be up to cooking them immediately, so you can either place them in the fridge for a day or two, or freeze them for up to a month.
- FRIDGE. They'll keep in the fridge for up to 2 days, but will be stiff. Just pour some freshly boiled water all over and quickly rinse in cool water to stop them over cooking and becoming gloopy.

- FREEZER. To freeze, cut them into strips by stacks (not rolled). Then don't peel the strips. Wrap the cut sheets as they are in clingfilm and freeze for up to a month.To thaw, just soak them in hot water for about 5 – 10 minutes until they can come apart easily. Just like shop bought frozen hor fun. Previously frozen hor fun or kway teow (shop bought or homemade) is more prone to breaking.
Video
Notes
- If you’re keeping it light, with just some beansprouts and greens, then it’ll feed 3.
- If you’re adding protein on top of that, whether meat, seafood or tofu, then it’ll feed 4.

2 thoughts on “Homemade Hor Fun Noodles (Flat Rice Noodles)”